Showing posts with label handwriting. Show all posts

Wednesday, August 14, 2013

Alternatives to standard pencils


While a standard #2 pencil works just fine for most students, many students prefer to use an alternative type of pencil when writing. Today I'll review some alternatives to standard pencils that I have used with students and why I like each one.


Golf Pencils | I often start students, especially young students (Pre-K and Kindergarten), with golf pencils because they fit so well in small hands. Despite what you may used back when you were in Kindergarten (I know I still remember getting a big, fat pencil as part of my back to school supplies), please remember, Small Hands = Small Pencil. I've found that older students sometimes find them easier to manipulate as well.


PenAgain Twist 'n Write | I have only used this pencil with students who have physical limitations and are unable to hold a pencil using a functional grasp. I have found this pencil works especially well with children who have muscle tightness in their hands, such as children with cerebral palsy.


Mechanical Pencils | I often recommend mechanical pencils for students who press too hard when writing. This works for some students, but for other students it is too frustrating and an erasable pen might be a better option. If you press too hard when using a mechanical pencil, it causes the pencil lead to break, which teaches some students to press more lightly, and just frustrates other students! Mechanical pencils can also be a good option for students who are easily distracted by trips to the pencil sharpener.

Pilot FriXion Ball Pen, Erasable Gel Ink, Fine Point, Assorted Colors 3 pack: Black, Blue, Red (FX7C3001)
Pilot FriXion Ball Pen | Last spring I saw a student using this pen and I had to check it out. This is an erasable pen that uses friction to erase the writing. Some students, especially those who do not press hard enough when writing, prefer writing in pen. Using a pen requires less pressure, which can decrease hand fatigue. I like this pen because it writes very smoothly. Oh, and because it's erasable! I'm so glad that there are some good, erasable pens on the market. (Side note: I saw these Frixion erasable highlighters when I was at Staples the other day. I was so intrigued by an erasable highlighter that it took all of my willpower to not buy them!)


Sharpie Liquid Pencil | I used this pencil with a student last year who really loved it, so I was surprised to see all of the bad reviews on Amazon. It's very similar to the Frixion Erasable Pen, except that it is liquid graphite. It would occasionally require the use of extra pressure to write, so I would say the Frixion Pen was a little better. I would use it with the same type of students who prefer an erasable pen, so it's really just personal preference between this liquid pencil and the erasable pen. My student said that he liked this pencil because it didn't make noise when he wrote. Talk about auditory sensitivity if the sound of a regular #2 pencil bothers you!

UPDATE:
Cheryl of OT Notes told me that her favorite alternative pencil is the Bic Mini Grip mechanical pencil because of its small size and built in sensory grip. Thanks for sharing, Cheryl! This is one that I will definitely have to check out!

*This post contains affiliate links.

 
What pencil alternatives have you found work well with your students?

Sunday, May 5, 2013

Is cursive a thing of the past?

cursive writing sample
 Photo via Flickr

My aunt, an English professor, recently shared a story with me about one of her students. Her student, a college freshman, approached her to talk about a paper he recently turned in. When she asked if he had a question about a specific comment that she had written on his paper, his response was, "Well, I can't read what you wrote. I can't read cursive."

Whoa.

My aunt was shocked. As an OT, I was surprised, but not shocked. I've spent a lot of time in elementary classrooms, and I know that many students are no longer being taught cursive. In fact, many students are not even being properly taught how to print! [side note - I'd like to point out that this is at no fault of the teachers and this issue probably requires its own blog post]

Is cursive dead?


The New York Times recently ran a Room for Debate column on Is Cursive Dead? The lovely folks over at PediaStaff were kind enough to bring this article to my attention and asked if I cared to weigh in on the discussion.

Okay, okay. So I've seen first hand that cursive is not being taught in schools. But what is my opinion on the demise of cursive? The big question here is:

Should schools require children to learn cursive?

In my opinion, no.

I learned to write in cursive in third grade. And I loved it! I thought it was fun. And so grown-up! And then, with the exception of a fifth grade teacher who required everything be written in cursive, I immediately stopped writing in cursive. Which means I have not regularly written in cursive since I was 10 years old. That was 20 years ago!

The times are changing, whether we like it or not, and it's time for our curriculum to reflect that.

Should students be exposed to cursive?

Yes.

Should students know how to read cursive?

Absolutely. After all, it's really not that different from print. Learn what the following 10 letters look like in cursive and you should be able to read cursive without too much difficulty: b, e, f, m, n, r, s, u, v, z.

Should students be able to sign their name in cursive?

Yes, even if it quickly turns into an illegible scribble unique to them, because that's all they need to be functional in this digital world.

Should students learn to write using paper and pencil?

Yes, but that doesn't mean it needs to be in cursive.

Should students learn how to effectively use technology for writing essays? For taking notes? For communicating?

Yes. Yes. And yes.

Cursive in the age of technology

So where does cursive fit in in today's technological world? We still have to sign documents and receipts, even though many of those signatures are now done electronically. As an occupational therapist, I sign my name on reports, progress notes, daily notes, IEPs, etc. For most adults, there's really no way around the signature.

But, with the exception of my occasionally legible signature, I only write in cursive when I am helping a student learn to write their name in cursive.

Wait. Let's think about this for a minute. I only use cursive when I'm teaching students how to write in cursive. After all that I've written above, when do I expect that they will ever use cursive in their lives? The answer is, I don't expect students today to ever use cursive. But as an occupational therapist, I want my students to be functional and independent, which I believe does include a cursive signature. After reading this article from NPR about the fading away of the signature, I'm beginning to question the relevance of a signature in today's world. Maybe the merit of a signature will come up in a future Room for Debate :-)

Some final food for thought for OTs and educators.

Why are we so insistent that students learn cursive? Is cursive really the best option for certain students with learning disabilities, such as dyslexia? If so, where is the research to support it? Where are the studies that provide evidence of the benefits of cursive writing on brain development?

Are we holding onto cursive purely because of nostalgia?

Does a legible signature even matter these days?


To hear more thoughts on cursive in this era of technology, check out PediaStaff's roundup of posts written by occupational therapists in response to the Room for Debate article!

Please weigh in with your thoughts on this conversation in the comments below. I would love to see this conversation continue.

Sunday, January 13, 2013

Tips for teaching kids to write thank you notes

green laurels thank you card
image credit

My students blessed me with many thoughtful gifts this holiday season. And then they blessed me all over again with their smiles of pure joy and happiness when I handed them a thank you card. Seriously, my students were so happy to receive a thank you card. But that's what gift giving is all about, right? Feeling good about brightening another person's day.

With the holidays now behind us, what better time to instill a sense of gratitude into children? And it's great for getting in a little handwriting practice, too!


Here are four basic guidelines to follow:

  1. Start with a greeting
  2. Say "thank you"
  3. Share how it made you feel or why you really like the gift
  4. End with a closing

A few more tips:

  • Get your child involved. Fold a blank piece of paper in half and have your child decorate the front or write 'Thank You' on the front.
  • If your child is not yet able to write, write the letter yourself, and then have your child sign his or her name (even if it's just scribbles).
  • Make a card on the computer. Allow your child to type the thank you letter. This takes the pressure off of the physical act of handwriting.

It doesn't have to be complicated. A thank you note from a child can look something like this:

Dear_______________,

Thank you for the ____________________.
I really like _________________________.

Love, (or Sincerely,)

_________________


See how simple it can be?

Friday, October 26, 2012

Five Friday Features

First things first. Drum roll, please....And the winner of the $50 Educational Insights Giveaway is.....Carrie Hager! Congrats, Carrie! Please send me an email so I can get your prize to you!

Not the winner? Don't despair! Thanks to the generosity of Educational Insights I will be hosting more giveaways soon, so be sure to check back!


1. I received my copy of Dark and Light: A Love Story in the mail this week! I'm so happy to see Shasta's book in print and so proud of what she has accomplished! Way to go Shasta!

2. The October newsletter from Tots-N-Tech is a great one! The topic is Using Visual Supports with Infants and Toddlers. The newsletter defines visual supports, helps you decide which type of visual support to use, and then gives examples and how-to's on making a variety of visual supports, from social stories to visual schedules to choice boards and more! What a fantastic resource! Click here to view the newsletter (it is a PDF file).

3. Love, love, LOVE these DIY travel size chalkboards from No Time for Flashcards. The tactile feedback that chalkboards provide are great for teaching letter formation.

4. On Wednesday I attended an in-service at work about Michelle Garcia Winner's Social Thinking. I'm very excited to implement some of the concepts I learned with my students! It should tie in nicely with concepts from The Hidden Curriculum.

5. I recently started a new job and I'm now working with more older children than I was previously, which means I'm being challenged to think of different ways to address skill development. This week I played a game of Twister with a couple of my students. What a fun way to work on strength, motor planning, and right/left identification! What activities do you use to work on right/left identification?
Twister


Friday, October 19, 2012

Five Friday Features

And the Easy Tie Shoelace winners are...Lisa and "just me". Please email me with your mailing address and I will get your shoelaces in the mail!

  1. Did you know that October is Sensory Awareness Month? Visit Simply Stavish to read my guest post: What Every Parent Should Know About Sensory Processing Disorder. Be sure to poke around Mindi's blog while you are there. She has tons of great content about speech and language!
  2. Handwriting Without Tears is offering a free online seminar on Tuesday, October 30 from 8-9PM EST. The seminar, Top 10 Questions About Handwriting, is sure to be full of useful information about handwriting education. I've watched Handwriting Without Tears seminars in the past and I'm always impressed with the organization and content. In my opinion, they are especially useful for new practitioners, parents and teachers.
  3. Do you use tongs and chopsticks all of the time to work on fine motor skills? MamaOT had a great tutorial on how to make kiddie chopsticks. Check it out! These chopsticks are easier to use than traditional chopsticks and are a great way to develop fine motor skills. (And she had a great follow up for 50 fun ways to play with tongs)
  4. OT research in the news!!! Occupational therapy researchers from NYU found that classroom yoga helps improve behavior of kids with autism.
  5. Didn't win the shoelaces? Don't despair! I have another giveaway. This one is from Educational Insights. Educational Insights manufactures educational toys and hands-on learning materials. And they've been kind enough to sponsor a $50 giveaway! Click here to find out what you have to do to enter. (Hint: it's really easy!)

Thursday, September 27, 2012

Tips for Teaching Lefties to Write

French homework
Image credit: eefeewahfah

I often receive questions from readers and a while back I received an email from a parent asking for tips for teaching her left handed son to write. This is a common question I receive from both parents and teachers, so today I'm sharing my tips for teaching lefties to write.

Tips for Teaching Lefties to Write:

  • Be a good model. Even if you're right handed, try to use your left hand when modeling correct letter formation and pencil grasp for the left handed child. 
  • Teach left to right progression. While you want to encourage your leftie to use correct letter formation and to complete pre-writing tasks (like tracing and connecting dots) from left to right, it is ok for lefties to do things that seem 'backwards' to right handed writers, like crossing the letter t from right to left.
  • Slant paper appropriately. Teach the child to appropriately slant the paper. A leftie should slant their paper with the top left corner higher than the right top corner.
  • Discourage the use of a hooked grasp. Many lefties tend to hook their wrist when writing. Use of a slanted surface, such as a slant board, can help better position the wrist. Also, practice writing on a paper taped to a vertical surface, like the wall or refrigerator door, to help improve the position of the wrist.
  • Encourage the use of a tripod grasp. Use a short crayon or pencil to encourage your leftie to use a tripod grasp (thumb and first two fingers).
  • Be aware of placement of written material to by copied. Write the letter or word to be copied on the right side of the paper or on the top of the paper. A common problem that lefties encounter is that they can't see what they're supposed to be copying! Since we right from left to right, their hand covers up what is on the left side of the paper. By placing information to be copied on the right side or the top of the paper, the child can better see what needs to be copied. Handwriting Without Tears does a fantastic job of designing their workbooks so both lefties and righties can see what needs to be copied.

Also, make modifications as necessary.

  • Modify worksheets. If you are making your own worksheets (e.g. a spelling word worksheet), place word columns on both the right and left side, so both righties and lefties can see the list of spelling words.
  • Modify workbooks. If making your own workbooks, put the binding at the top, so the left handed writers don't have the bump the binding causes in their way.
  • Modify notebooks. Allow lefties to use notebooks backwards so the binding doesn't get in their way.
  • Modify seating. Have lefties sit on the left side so they don't bump elbows with other students when writing.

For more information on teaching lefties to write, please visit:

Left Handers' Day and the teaching resources page of Anything Left Handed.

Do you have a question? If so, email me at AbbyPediatricOT@gmail.com and I'll do my best to get back to you with an answer!

Monday, September 24, 2012

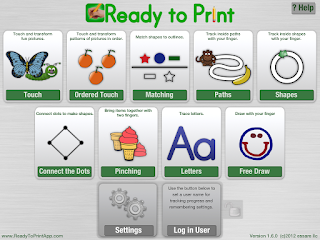
Ready to Print App


Ready to Print is a pre-writing app that was developed by an occupational therapist with more than 20 years of experience working with children. This app progresses through pre-writing skills in a specific order so that children can master the skills necessary for writing.

Here's a quick breakdown of each skill addressed in this app:
Touch: This activity focuses on basic index finger isolation and visual scanning skills. It contains 16 different levels, with different pictures and varying number of pictures. The size of the items may be changed to match the child's skill level. As seen below, when the child touches the picture, it turns into something else!
Ordered Touch: Like the Touch activity, Ordered Touch focuses on index finger isolation and visual scanning. By prompting the child to touch the items in a specific order, it also addresses visual tracking skills. This activity introduces the directionality of writing strokes (left to right, top to bottom, starting at the top) by the order in which the items are to be touched. As you can see below, the eggs turned into fried eggs when each egg was touched, with the sequence starting at the top, just as a letter would start at the top.
Matching: This activity works on visual scanning, visual tracking and visual motor skills by having the child match the shape to the outline of the shape beneath it. Recognition of basic shapes is also important for pre-writing, pre-drawing, and pre-math skills. The Matching activity can be set up to have between 2 and 6 shapes shown on the top, depending on the skill level of the child.
Path Following: This activity focuses on visual tracking, visual motor and fine motor skills. The child draws a line inside the path from one picture to another. The paths progress in complexity and develops strokes to be used in writing letters. The width of the path can be changed to match the child's skill level.

Shape Tracing: This activity also focuses on visual tracking, visual motor and fine motor skills. As with the Path Tracing, the shapes progress in complexity. The direction that the child is prompted to trace the shape teaches correct stroke patterns for writing letters. The width of the path can be changed to match the child's skill level.

Connect the Dots: This activity focuses on visual tracking, visual motor and fine motor skills. In this activity the child draws a shape by connecting dots. Again, the shapes progress in complexity and directionality is taught to promote correct stroke patterns when writing letters. The child is then given the opportunity to copy the shape on the right side of the screen.

Pinching: This activity focuses on fine motor skills, specifically developing a pincer grasp, which is important for developing a correct grasp on a writing utensil. In the activity, the child uses two fingers to bring two items together. In the example below, the child would pinch the bird into the cage.
Letters: All of these pre-writing activities lead up to tracing letters! The latest update of this app now includes lowercase letters as well as uppercase letters. The child will now incorporate all of the skills learned to begin to learn correct letter formation of capital and lowercase letters.
 As in the Dot to Dot activity, the child has the opportunity to copy each letter on the right side of the screen.

Free Draw: This is a blank canvas for drawing with a finger or stylus. The child can use this to practice the pre-writing skills he has learned or just draw a fun picture!

Read more after the jump to find out how I use Ready to Print in therapy and what I like the most about this app!

Monday, August 13, 2012

Speaking of apps I love...

The Handwriting Without Tears app has finally been released!!! I've been waiting for this for years...only to find out the app is not compatible with the iPad 1. Maybe I'm old school (I prefer the term early adopter), but my iPad 1 is all I've got, and I can't download this app that I've been waiting for years to be released :(  I hope the folks at Handwriting Without Tears will do something to remedy this, as I know I'm not the only one who has an iPad 1 and can't afford to buy the latest iPad every year.

If you'd like to check it out, you can learn more about the app at www.wetdrytry.com.
Handwriting Without Tears: Wet-Dry-Try Capital Letters & Numbers is available for purchase from the app store for $4.99.

Has anyone gotten their hands on this app? Is it is great as it looks? I would love to hear all about it!


Friday, August 10, 2012

Friday Features

This week I...

- Shared tips for helping students who press too hard when writing over at Dr. Anne Zachry's blog, Pediatric Occupational Therapy Tips.

- packed and I cleaned. And then I packed some more and cleaned some more. How did I accumulate so much stuff? Anyway, I think I'm almost done. We hit the road for our cross country move on Tuesday. I'm very excited to be a resident of the East Coast! I can't wait to experience four seasons again! My blog might be a little quiet for the next month or so, but I will try to post now and then. I do have some families lined up for the Parent's Perspective series, so be sure to check back every Wednesday for more great tips from parents!

Friday Features Links:

I have lots of great information starred in my google reader this week, so here we go:

- Handwriting Without Tears is offering a free online seminar, Get Set For School: Top 10 Ways to Prepare Your Children for Kindergarten, on August 21. I've watched this seminar in the past, and it has great tips for parents and educators.

- Ellen, over at Love That Max, interviewed a member of the American Red Cross Scientific Advisory Council and received lots of great tips on the best swim gear for kids with special needs.

- Another great post at Love That Max. A reader is looking for IEP tips. Please go over and share your experiences! Or just read through the tips readers have already shared!

- Thank you to Carol at OT's With Apps for the heads up that Skill Game by Good Apps is free for a short time. This looks like a good app to work on visual motor/perceptual skills in older students. I just downloaded it and can't wait to try it out! By the way, if you're looking for good apps to use in therapy, you should definitely follow her blog!

- This week I came across Miss Mancy's blog. What a great find! Written by an OT, it is full of creative therapeutic activities, especially fine motor activities.

- Remember back in May when the pediatric OT world was shaken up by The American Academy of Pediatrics statement on the use of sensory integration therapy? AOTA President, Dr. Florence Clark, has written an essay on the current status of sensory integration therapy. She is optimistic about the future of sensory integration therapy, but I think it still boils down to, OTs need to be doing more research to support the interventions we use. What do you think?

- CHASA has a new Ask the Professor feature on their website. Dr. Andrew Gordon will be answering questions related to hand therapy, hemiplegic cerebral palsy, and related topics. This is sure to be a great resource for parents!

- Columbia University has developed a new intervention for children with hemiplegia called Hand-Arm Bimanual Intensive Therapy (HABIT). It is an intensive therapy, as is Constraint Induced Movement Therapy, but in HABIT the focus is on the use of both hands. Researchers are currently looking for study participants. Click here to learn more about participation.

- Stuart Duncan, of Autism from a Father's Point of View, who has autism himself, wrote an interesting post titled, Autism is. His perspective is always interesting and this post is definitely worth a read.


I did not intentionally seek out extra links this week, it just so happened that a lot of articles caught my eye. This should be enough reading material to keep you busy for a few weeks while I make my way to the East Coast! Happy reading!


Thursday, August 9, 2012

Help! My child presses too hard when writing!

Yesterday I had the pleasure of sharing some strategies to help children who press too hard when writing, on Dr. Anne Zachry's blog, Pediatric Occupational Therapy Tips.

Here's a preview:
Tip #1 - Increase hand and arm strength.
Tip #2 - Write with mechanical pencils.

Head on over to Dr. Zachry's blog to find out what the rest of my tips are and why I recommend them!


Thursday, May 17, 2012

Handwriting Standards

Did you know that Handwriting Without Tears has a Handwriting Standards Document


If you are familiar with state standards, the writing standards are generally geared more toward composition (composing sentences and paragraphs, working up to essays). The only standard addressing actual handwriting is usually something like, "produces legible handwriting." Not very helpful, right?


The Handwriting Standards available on the Handwriting Without Tears website, have handwriting standards by grade level for Kindergarten through 4th grade. These standards are definitely based on the Handwriting Without Tears curriculum, but I find them to be very helpful guidelines, even if your school district does not use the Handwriting Without Tears curriculum.


I personally use the standards as a resource for writing grade-level appropriate IEP goals, as well as having on hand to educate parents and teachers on handwriting skill expectations for their child.

Friday, April 27, 2012

Friday Features


This week I...
~had fun playing this game with some of my students. I'm not sure where the game came from (I think someone I work with found it at the dollar store), but it's been a fun fine motor/visual motor warm up. 

~guest blogged over at Having a Fields Day, in support of Autism Awareness Month. Be sure to stop by and check out my Sensory Strategies for Toddlers with Autism!

Friday Features Links (lots of good stuff this week!):
~I know I've mentioned once or twice how much I love the Handwriting Without Tears handwriting curriculum. If you'd like to know what someone else thinks about it, visit Testy yet trying, for a detailed review by an SLP and mom.

~Allie, at Having a Fields Day, wrote a terrific post about starting the Early Intervention process. This well organized post is a great resource for parents who find themselves beginning the evaluation process for EI services.

~The Atlantic put together a touching photo gallery for Autism Awareness Month. I would love to see more group homes like the one featured at the end of this photo gallery.

~Thanks to Carol Leynse Harpold over at OT's With Apps for sharing a link to 40+ Super Secret iPad Features and Shortcuts. This was very useful to me and taught me some things I didn't know I could do with my iPad (like splitting the keyboard to make typing easier!).
 

Wednesday, March 21, 2012

How to make a slant board


A slant board provides a slanted writing surface, which can better position a student's wrist for writing. Placing writing paper on a slant board can also make it easier for the student to copy information from the board.

The price of a slant board can vary from $40-$100 in a therapy catalog, so I often make my own.

I have a student who was hooking his wrist like this (yikes!):

I made a slant board to improve the position of his wrist and now he writes like this:
     Much better!


To make your own, here's what you'll need:
 
  • two old binders
  • clipboard
  • Velcro
  • duct tape


1. Use the duct tape to tape the two binders together.

2. Attach Velcro to the back of the clipboard.
3. Attach the clipboard to the binders
vertically,


or horizontally.


Friday, March 9, 2012

Friday Features

~Handwriting Without Tears is developing a university curriculum. This supplemental handwriting course for university professors to offer to their students will provide exposure to teaching handwriting. To get the word out, Handwriting Without Tears will send a copy of the curriculum to interested professors for free! If you are a professor or a student, click here to sign up to receive a copy.

~I came across the blog ARK Therapeutic, which provides tips on how, when, and why to use their many products, including the grabber, z-vibe, and lip blok, which are all products that I use. This is a great resource for therapists using these ARK's tools.

Monday, March 5, 2012

LetterSchool App

I occasionally use my iPad in therapy sessions, and I have been on the lookout for a good handwriting app. I tried out several handwriting apps, but didn't really like any of them. Thanks to the Thriving in School blog, I have recently discovered (and love!) the LetterSchool App.

The LetterSchool app teaches letter formation by having the child tap, trace, and then draw the letter. This app provides lots of auditory and visual feedback, and works on letter sounds too!

The LetterSchool app also allows you to choose D'Nealian, Handwriting Without Tears, or Zaner-Bloser letter formation, as you can see below.
The first video shows a student using the LetterSchool app to form the letter D.
This second video shows how I've been using the LetterSchool app in conjunction with the Handwriting Without Tears Letter Cards to develop handwriting skills in the same student. (Be patient, it's a little slow in the beginning, because I was trying to limit my prompts).
I love the second video, because it shows how using this app is translating into a functional skill! I initially hesitated to use the iPad in therapy, because I wasn't convinced that it could enhance fine motor or handwriting skills in a way that would carry over to a functional skill.

The child in this video typically requires A LOT of assistance to complete any writing task. He uses very light pressure when writing and he and rarely looks at the paper.

You can't see it in the video, but he is looking at the iPad, the Handwriting Without Tears Letter Card, and the dry erase board! He even looked up and made great eye contact with me when imitating the words and sounds on the app!
 
After using this app, I am convinced that using certain apps in conjunction with other therapeutic activities can improve functional outcomes.  I would love to see some research done on this!


The LetterSchool app is available from the Apple iTunes App Store for $2.99.


Wednesday, February 22, 2012

Handwriting Without Tears Letter Card Adaptation

I feel like I'm on a Handwriting Without Tears kick this week! Today I'd like to share with you how I adapted the Handwriting Without Tears letter cards to help one of my preschool students. 

Due to his limited motor control, when he tried to trace the letter L, it kept looking like this. More of a random line from the beginning to the end, rather than an L.


So I added a few Wikki Stix to the edge of the L. This created a physical boundary, as well as a high contrast visual boundary.


Now he can trace the L more successfully!

Wednesday, February 8, 2012

How to make an adapted crayon

I was working with a preschooler and he noticed this pencil in my (over-flowing) pencil box and wanted to try it out.

This student has cerebral palsy and since his grasp on a regular crayon is one of those grasps best described as "funky" (see below), this Y-shaped pencil worked fairly well for him.
There were a few problems with the pencil: 1) it was too big for his hand and 2) a crayon would be a more appropriate than a pencil for a 4 year old. I couldn't find any crayons for purchase that are similar to the Y-shaped pencil, so I decided to create my own.

I want to preface this how-to with the disclaimer that I don't typically use any sort of adaptations or pencil grips for children this young. I prefer to give preschoolers very short crayons and develop their fine motor skills, rather than provide adaptations. With that said, each child is unique, and that's why I adapted this crayon for this particular child.

I used Crayola Air-Dry Clay to form the base of the crayon.

I then placed half of a crayon in the tip of the clay to create this crayon (the air-dry clay takes 1-2 days to dry).
He loves his new crayon! This is a work in progress, so I'm still trying to figure out an easy way to swap out the crayon, so he can color with more than one color :) Any suggestions?

Monday, January 30, 2012

Adapted Paper for Math

Difficulty aligning numbers when completing math assignments is one of the most common handwriting related problems I see when working in the schools. Today I'd like to share some adaptations that I've used successfully with students.


I found a great website that allows you to make your own graph paper for free! It definitely takes some playing around with the dimensions to get the squares the size you want, but it is worth it in the end. I've created small, medium, and large graph paper.

The small is about the same as standard graph paper you can buy at the store. I don't use the small one very often, because it is too small for most students. I use the medium size the most, although the large is good for younger students.

The dimensions I used for each:
Small Graph Paper:                Medium Graph Paper:                 Large Graph Paper:
minimum border: 0.50"           minimum border: 0.50"                minimum border: 0.50"
grid line weight: 0.50 points   grid line weight: 0.50 points         grid line weight: 0.50 points
spacing: 4 lines per inch        spacing: 3 lines per inch              spacing: 2 lines per inch


Here's the medium graph paper in action:
I also used the inverted graph paper option to create this paper:


This paper can be helpful for young students who are just beginning to complete written math assignments.


The dimensions for this paper:
minimum border: 0.5"
grid line weight: 15.00 points
grid spacing: 1 line per inch
color: blue (and then I printed on a black ink printer to get the gray color seen above)


Another option is to use RediSpace Transitional Notebook Paper by Mead. This paper was created by an occupational therapist and helps with spacing between words. It can also be used for math.
Here's a picture of the cover of the notebook, which provides an example of how to use the paper for math.


And here's a picture of the paper being used for math.


I like using the Redispace paper because it looks similar to standard notebook paper, which is often important to students, because they don't want to look different from their peers.


Last, but not least, here's an old standby. Turn standard notebook paper sideways and use the columns to align the numbers. The only downside to this technique is that it does not provide a baseline, which some students need. I often see teachers encouraging their entire class to use their paper in this way to complete math assignments. By having the entire class do math assignments in this way, it does not single out the students who need special paper to keep the numbers lined up.


What strategies do you use to help students line up numbers when completing math assignments?


You might also enjoy: