Showing posts with label sensory exploration. Show all posts

Friday, May 30, 2014

Favorite Summer Activity | Ice Cube Painting {+ blog hop giveaway!}

Inline image 1


I'm so excited to be teaming up with a great group of therapy bloggers to share some of our favorite summer toys and activities! And a giveaway! We have each picked out our favorite summer toy or activity, and since we're a bunch of therapists, of course we'll be sharing how these toys can be used to promote development! Summer fun AND learning. That's what we're all about! Read on for more details about how to enter the giveaway. Wouldn't a $50 gift card to Amazon be a great way to kick off your summer?


HERE'S HOW IT WORKS:
Step One:  Use the Rafflecopter below to enter to win a $50 Amazon gift card to purchase a favorite summer toy!
Step Two: Visit each of the 10 blogs below and COMMENT on their post about their favorite summer toy or activity.  Have you tried it?  Will you buy it?  Would your kiddos love it?  How would you use it? 
Step Three: After you comment, earn additional entries by "liking" each blog's Facebook page, straight from the Rafflecopter! (if they have a Facebook page).
***REMEMBER: You will only be entering the Rafflecopter ONCE ON THIS PAGE, not on every blog in the hop. The contest is open to anyone 18 years of age and older. Winner will be chosen at random via Rafflecopter and will be notified by email once entries have been verified (comments on each blog, Facebook likes on each blog). Please read full rules on the Rafflecopter before entering. VOID WHERE PROHIBITED BY LAW. Giveaway closes at 12:00am June 6.


Participating therapy bloggers:


OT Cafe (that's me!) | The Inspired Treehouse | Golden Reflections Blog | Pink Oatmeal | Therapy Fun Zone | Your Therapy Source | Mama OT | | Playapy | Starfish Therapies | Playing with Words 365

My Favorite Summer Activity: DIY Ice Cube Finger Paints

Finger painting is such a fun sensory activity for kids and can be easily modified for those who are not quite ready to touch the paint. In the summer, finger painting with ice cubes is a great way to explore AND stay cool!

The best part about ice cube finger paints? They are so simple to make! All you have to do is fill some ice cube trays with your favorite finger paint. I fill mine about half way, because small cubes are perfect for small hands!


Pop them in the freezer for a few hours and you are ready to go outside and get messy!


For kids who aren't quite ready to touch the paint with their hands, never force them to do so. Just give them a paintbrush and let them explore at their own pace. If you're outside, you can use a stick, pinecone, or a leaf as your paintbrush! Have fun exploring with your senses this summer!

These finger paints can be made with any ice cube tray that you have at home, but if you win the Amazon gift card, you could pick out some fun ice cube trays. There are so many fun shapes to choose from: hearts, stars, and even hexagons, just to name a few. And I LOVE these little fish trays! Of course, the OT in me thinks these cubette trays would just be perfect for little hands.

**Amazon links throughout are affiliate. Thanks for supporting this blog!
 
ENTER THE RAFFLECOPTER BELOW AND THEN BE SURE TO VISIT ALL OF THE OTHER BLOGS THAT ARE PARTICIPATING FOR MORE SUMMER FUN!


a Rafflecopter giveaway


Monday, November 12, 2012

Tactile Turkey

Last week was handprint turkeys; this week it's a tactile turkey!
This comes courtesy of my nephew and I thought it was such a great idea! Great for tactile exploration and for sorting skills. Just gather some dry food and birdseed from around the house and start gluing! Noodles, different colored sprinkles, rice, and birdseed would all work well for this craft.


Monday, November 5, 2012

Handprint Turkeys

It's already November, which means it's turkey time! Last year I shared this simple handprint turkey:


Here's another cute handprint turkey:
I like that this one adds an extra visual motor component by placing a color on the tip of each finger. The handwriting practice is always good, too!

Monday, October 22, 2012

Halloween is right around the corner!

With Halloween coming up, now is a good time to review AOTA's Tip Sheet for Enjoying Halloween with Sensory Challenges. You can also read my Halloween tips here and tips from Sensory Smart Parents by clicking here. Lisa Quinones-Fontanez also shared some great tips on To The Max on Making Halloween Fun For Kids With Autism.

Yahoo Voices has some recommendations for Halloween costumes for sensitive kiddos, using mostly clothing that your child already wears to create a costume. That may make it easier for your child to accept wearing the costume.

Some tasty treats for Halloween:

Simple Pumpkin Cookies from Stephanie at Early Intervention Speech Therapy
And here are a couple of my favorites from last year:
Sweet and Salty Pumpkin Seeds
Dirt and Worms (this recipe helps develop fine motor skills, too!)


Halloween crafts:

Handprint Spider from Housing a Forest
Fall leaf fine motor craft 
4 Halloween Fine Motor Activities from MamaOT
Fine motor pumpkin from Embrace Your Chaos
Clothespin Spiders


Get messy:

Pumpkin spice playdough

Visit Growing a Jeweled Rose to learn how to make pumpkin scented paint or pumpkin scented cloud dough.
If your little ones aren't quite ready to get messy, Miss Mancy has a great Touch, Feel, and Sort Halloween activity, which also works on fine motor skills. Gotta love that!

Get up and move:

Ghost bowling from No Time for Flashcards (works on fine motor skills, too!)
Miss Mancy has a fun spider maze to work on lots of OT skills.
Take those pumpkins outside and do some chuckin' pumpkin painting. I love this idea from Childhood Beckons!

Read:

Sensory Smart Parent recommends reading the book, Go Away Big Green Monster, with your child prior to Halloween, to address fears and how to manage them.


Pam Dahm, of Chit Chat and Small Talk, shared a Trick or Treating Social Story. Social stories are another great way to help prepare your child for Halloween.


What are you doing to prepare your child for Halloween?


Friday, October 5, 2012

Five Friday Features


It's officially October and Halloween activities are everywhere. Here are a few I think are worth checking out (plus a few other things worth reading this week).


1. Last October I posted a recipe for pumpkin spice playdough (you can see the pumpkins I made above!). Mom Not a Pro has come up with another fun way to use pumpkin playdough - put it in baby food jars to create little pumpkin favors! What a cute idea! And squishing, rolling and pinching playdough helps to develop fine motor skills.

2. Miss Mancy has a fun twist on the usual sensory bag. Check out how she encourages fine motor skills with a fun Halloween sensory bag.

3. Last week, I mentioned the app review by OT's With Apps of the Wet-Dry-Try app and the incorporation of manipulatives with the app. Well, Your Therapy Source tried out the use of a sponge and reports that it really does work! Which further inspired me to try using a sponge, and indeed, it really does work! Yay! I'm so excited about this discovery! {That's a photo of me using a sponge on the LetterSchool app, if you were wondering}


4. With the arrival of October, that also means that it is almost time for World OT Day and the OT24Vx. This is a free 24 hour virtual exchange containing live speaker presentations and discussions from the international world of occupational therapy. I think I'll try to actually listen in on a few this year. Or at least catch them on the archives if I don't want to stay up all night or skip work :)

5. The American Academy of Pediatrics and HealthyChildren.org has just released a new publication, Autism Spectrum Disorders: What Every Parent Needs to Know. Through October 14th, you can download a free 83-page excerpt and the entire publication is 30% off through the end of October. I've briefly skimmed through the free 83-page excerpt (the entire thing is 300+ pages!) and it looks like a great resource for parents and therapists. You do have to register on the HealthyChildren.org website to gain access to the free excerpt, but I'm sure as with all websites that you can opt out of being on their email list if you don't want to be hounded by them.

Monday, May 14, 2012

Jello Painting


Looking for simple activity that smells good too? Just add a little water to jello powder, stir it up, and you have a sticky, gooey, and aromatic "paint"!

I like to immerse my selective eaters in activities relating to food, and this is a great one to encourage smelling, which is often one of the first steps when I introduce a new food.

Here's our completed project!
 When it dries, it has a grainy texture and it smells delicious too!

Wednesday, March 7, 2012

Cloud Dough

Scoop it and mold it and then let it crumble between your fingers!
I added pegs for my preschoolers who weren't quite ready to touch the cloud dough with their hands. They could push the pegs into the dough and pull them out, without actually touching the dough.


Make a mountain,

or practice pre-writing strokes.


What you'll need:
  • 4 cups flour
  • 1/2 cup of baby oil

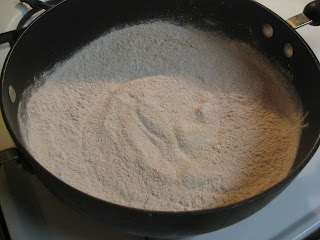
Or any 8:1 ratio of flour to oil (vegetable oil might be better for kids who tend to taste everything)

Just mix the flour and oil together and you have cloud dough!


Wednesday, February 29, 2012

Oobleck Recipe


Here's a fun sensory filled way to celebrate Dr. Seuss' birthday on March 2nd. Read Bartholomew and the Oobleck and then create some oobleck of your own!

What you'll need:
  • water
  • cornstarch
  • food coloring (optional)
Oobleck Recipe:
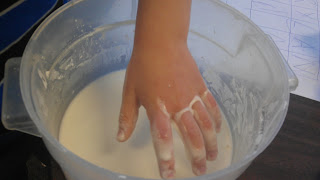
Mix 1 part water with 1.5 to 2 parts cornstarch. Add a few drops of food coloring if you want to make it colored. Stir and stir some more! You will need to stir for about 10 minutes to create oobleck, a weird semi-solid mixture. 


Enjoy!

We used the paintbrush to stir the mixture. For the kids who weren't quite ready to touch the oobleck with their hands, they could participate by stirring or just using the paintbrush to touch the oobleck.

Monday, February 6, 2012

Handprint Valentine's Day Card

I can't believe it's February already! This Valentine's Day card is courtesy of my nephew. It looks like he dipped the sides of his little fingers in red paint and then pressed them into a heart shape. Cute idea for Valentine's Day!

Wednesday, January 18, 2012

Shaving Cream Snowman


This is a simple winter activity involving tactile sensory exploration and body awareness. 
Use shaving cream paint (see recipe below) to make a snowman on construction paper and then add body parts (cut out of colored paper). When the snowman dries, it will feel puffy!


The child who made this snowman didn't mind getting messy, but remember to offer a paintbrush, Q-tip, sponge or other tool for your more sensitive kids.


Recipe for Shaving Cream Paint:

  • Mix equal parts of shaving cream and glue
  • Use a paintbrush or hands to paint
  • Shaving cream paint will be puffy when it dries
  • Optional: add a drop or two of food coloring (I like to add red to make pink hearts for Valentine's Day)

Wednesday, January 11, 2012

Tactile Winter Scene


I spotted this cute winter scene in a classroom I was visiting this week. I get some of my best inspiration from creative teachers and classroom aides! I love that this incorporates fine motor skills (squeezing a hole punch to make snow, pinching and gluing), as well as tactile experiences (glue, cotton balls, pom-poms, shredded wax paper).

Friday, November 18, 2011

Handprint Turkey


Another fun activity for Thanksgiving!


Dip the child's hand in paint to make a handprint, then draw the legs and face. For children who aren't as excited about dipping their hands into paint, it also works well to paint the child's hand with a paintbrush. Just remember, don't ever force a child to touch a texture that they don't want to touch. Encourage the child to participate in the activity in a different way, such as tracing the child's hand and then having the child paint their handprint with a paintbrush.

ENJOY!


Monday, November 14, 2011

Pumpkin Spice Playdough

Playdough is always a fun way to work on fine motor skills. The addition of pumpkin pie spice to this traditional playdough recipe smells so good you will want to eat it!

What you'll need:
  • 1 cup of flour
  • 1/2 cup of salt
  • 2 teaspoons cream of tartar
  • 2 teaspoons pumpkin pie spice
  • 1/2 teaspoon cinnamon
  • 1 tablespoon of vegetable oil
  • 1 cup of water
  • food coloring (approximately 5 drops of red and 12-15 drops of yellow)
 First, combine the dry ingredients in a pan:


 Then, add the oil, water and food coloring:


Stir until smooth:


Stirring constantly with a rubber spatula, cook the mixture over medium heat until it forms a ball, approximately 3 minutes:
Let the dough cool slightly and then knead until it has a smooth texture:
Store in a ziploc bag for 1-2 weeks to maintain freshness. 

To make stems, gather some noodles, a ziploc bag and green food coloring:


Place the noodles in the ziploc bag with a few drops of food coloring and a teaspoon of water. Squish the noodles around until they are colored. Place on a plate to dry before using.

Have fun rolling and squeezing the playdough into little pumpkins! Work those little fingers to add the stems:
Or maybe make one big pumpkin!

Friday, October 21, 2011

Sweet and Salty Pumpkin Seeds

It's pumpkin carving time! This is another fun activity for Halloween. Pumpkin carving is great for tactile exploration and then the little ones can help turn the pumpkin seeds into a crunchy snack.


Recipe for Sweet and Salty Pumpkin Seeds:
What you will need:
  •  seeds from one medium sized pumpkin (approx. 1 cup)
  • one tablespoon of butter (melted)
  • 2 tablespoons of sugar
  • 1 teaspoon of sea salt
  • 1/2 teaspoon of cinnamon

First, carve your pumpkin and pull out all of the goop and seeds


Next, separate the seeds from the goop
Then rinse the seeds in water to remove the remaining pumpkin goop


Now it's time to make some sweet and salty pumpkin seeds!
Mix the butter, sugar, salt and cinnamon together to make a paste
 
Then toss the pumpkin seeds with the mixture (it helps if you let the pumpkin seeds dry out first)


Now spread the coated pumpkin seeds out on a baking sheet and bake for 20-30 minutes at 275 degrees. Be sure to keep an eye on the pumpkin seeds and to stir them often, so they don't burn.
Enjoy your sweet and salty baked pumpkin seeds!


And don't forget to finish carving your pumpkin!
Happy Halloween!


You might also enjoy: